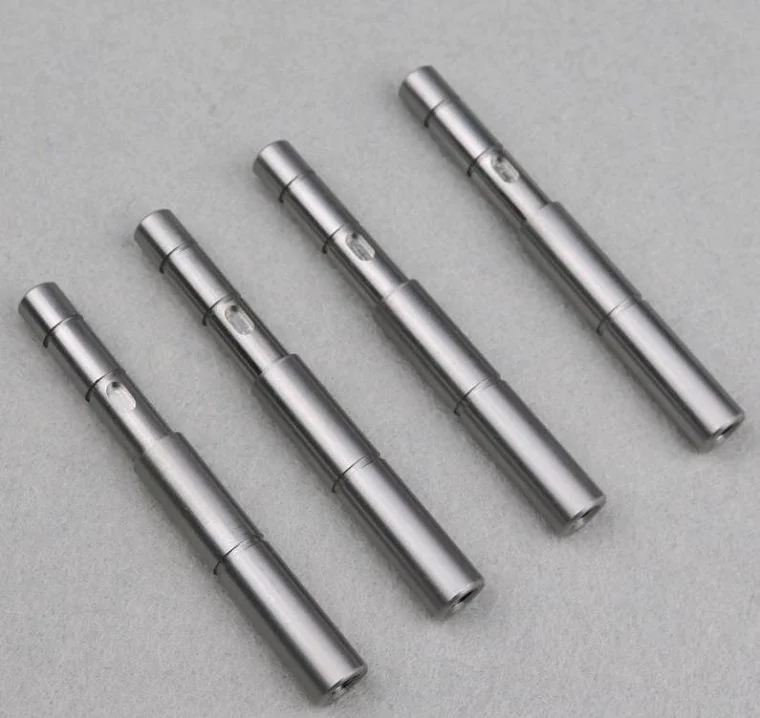
Shortly after assembling the 3D printer ( Schlabricator) My wife, Hive, aka her. Who-Must-Be- I obeyed and expelled my beloved, but there was a slight smell in the garage. Structure originally built for Model- Due to agnarledRussian Olive blocking the driveway, T era\'s vehicle is behind the house and cannot be used as a garage. The building has power but no heat, which is the motivation to build a fence for my Printrbot. When the weather is cold-in the 40\'s - The actual heating of the heating bed takes too much time. I have tried insulating the glass with a paper blanket, but it still takes too long and the temperature drops when the \"blanket\" is removed. Update: I \'ve been using this shell almost every day since I built it, and I can tell you two things: it works really well in capturing heat and controlling the thermal environment around the printer, venting is a vain vanity. Sure, it looks cool, but can guarantee a ventilated housing if it\'s warm enough ( Like happens occasionally in summer) I just need to pull down the hinge pin and remove the door. Don\'t lose the door! Just saying I\'m building a smaller shell for another home After a frustrating experiment with PLA, I worked on the 3D printer for ABS. Other uses of the 3D printer housing may include reducing smoke, noise or preventing dust or curious cats. Add my 3D plexiglass adventure anyway. . . My first vision for this project isthe- Used to build an organic glass sheet into a box with a shelf metal hardware solution containing my Printrbot. As I strolled down the aisle of Home Depot, there was a quiet voice in my mind that reminded me that I could print the brackets that attached the plastic together. I dismissed the sound when I weighed the merits of the various shiny galvanized buckets -- The Perf hangs neatly on the perfboard display. Taking into account a preliminary mental blueprint, I collected what I thought I needed: 1/8 Thick plexi, various angular brace, nuts, bolts, hinges and return to the ranch. I work with acrylic in the high school store and we stick together with glue and sandpaper our keys and pen holder. However, when I put the drill bit on the plastic, no matter how the variables such as pressure, rotation speed or bit size change, the plexiglass usually (and violently)crack. At this point, I believe most of you are ahead of me, but after more than a dozen such fabrication failures, the voice in my head becomes unnegligible: \"Print hardware, stick the box together \"I:\" Maybe I should print the hardware. . . \"Inner voice:\" Geesh \"My mental blueprint has just been etcheda- But now the vision is clearer. The small ABS block sticks the plexiglass square to the corners and edges. I still need to plug the wire in and possibly drain the excess heat from the housing, so I want the hole saw to work better than the drill bit. Fortunately, I now have an extra piece of organic resin to experiment with despite cracks. Although, at the core of each hole saw is the drill bit, there is no catastrophic cracking in the test holes I produce. This may be feasible. After the unknown number of visits to various hardware stores, here\'s what I \'ve collected to build the 3D printer housing: 5 \"Optix\" acrylic sheets, 1/8 thick, 18X24 inch- $10 Home Depot- Consider an extra sheet to practice cutting and drilling. You can buy a thicker one. 1/4\") But it is more expensive and it may be more difficult to cut precisely. Devcon household plastic welding machine ( This is an epoxy resin with solvent inside which can combine ABS with acrylic resin Something very annoying. I also glue ABS to ABS with Duco Cement. There will be more information about glue later) 1 inch hole saw 2-inch hole saw ( I just bought the cheapest ea at Home Depot, about $5) Rare earth magnets for closing ( Home Depot is about $4) Block Tape6 wood screws ( Hold down everything on the workbench) These are the tools I found useful: straight edges or frame squares Suitable for cutting plexiglass, inspect cordless drill bits and various drill bits for cutting plexiglass and various trimming, measure pocket knives for smoothing acrylic edges and ABS surfaces 200- 400 grit3D printer for creating a gizmacci for connecting the acrylic flat face, large enough to give you access to all sides of the shell --in-progress. ( I use the kitchen floor) The size of the acrylic sheet was easily lent to a box large enough to accommodate my Printrbot Plus. I decided to make the case 24 inch deep, which means I don\'t have to cut three sheets. From the other two sheets of paper I will cut off the back, the door and two smaller straps to secure the case to the top and bottom of the door. Nominal size block, left and right sides: 24 inch per 18 x, whole acrylic: 18X17 3/4 ( Must cooperate between the two sides) Doors: 17X17 3/4 ( Must be installed between sides and not bound to the top and bottom of the shell) Braces: 2X3/4 ( Insert the top and bottom of the door at the back and inside of the door. ) The finished housing is 18 1/8 high, 24 inch deep and 18 inch wide. The top is on the side and back, so the width of the top paper determines the width of the back (or door) The thickness of the side is small. If the top is exactly 18 inch wide, the back will be 17 3/4 wide ( 1/8 on each side, remember? ) Please take a moment to measure the width of your acrylic resin. Mine is a bit wider than the 18 inch advertised, and when I cut my back and doors, I found them a little narrower than they were. While we were there, I found a few sheets at Home Depot that were not square. With the goal of minimizing errors and cutting effectively, checking your inventory with tape measure and square in the big box store can save you some grief. I found that the best way to cut acrylic sheet is almost no need to cut. Acrylic film covered on both sides- Easy marking to measure and keep the plastic intact. 1. Carefully measure and mark the clips you wish to make on the film. 2. Align straight edges along a straight line. 3. Carefully cut protective plastic film along a predetermined cut with a knife. 4. Keep the straight edge on the line, flip the knife over, use the point, not the edge, and copy the line multiple times. Repeated deep scratches along the straight edge; If handled properly, delicate shavings will fall off the acrylic resin. 5. Repeat the score on the other side of the acrylic sheet. Time required for accurate measurement The score must be parallel. 6. Clamp the paper or securely secure it under the straight edge with a marking line along the sharp edge of the counter or table. Apply a sharp downward pressure to break the paper along the engraving line. 7. The new edges can be lightly polished or scratched with a blade to be smooth. A slight slope actually makes it not easy for the acrylic resin to break apart, thus cracking. Izmacci/\"giz ma chee\"/n. pl. Something, device, or part whose name is not important or unknown; A gadget, a trick, something, what\'s that from Indiana, fighting Dad, orwhatchamacalillo. Probably a carriage of gadgets and machines. Use the following printable items when building a 3D printer enclosure ( Click on the link to download from Thingiverse. Com in STL format) : Gizmacci one these brackets are used to glue a suitable square box from acrylic sheets (AKA plexiglass). Here are the extra brackets ( If you need/want them) Used to glue a suitable square box with acrylic sheets. Gizmacci three is an adjustable vent located at the top of the plexiglass housing that passively emits hot air and smoke through convection. Designed to 2 inch holes. I saw a new hole with slow speed and had a very good success. The rotary pin of the vent is part of 3. 0mm ABS filament with hot elements such as soldering iron at the end. You can clean this small hole with a 1/8 bit, which is a bit larger than the 3 Th. 0mm. Gizmacci FourThese has a hinged door housing. The pin suspended by the hinge is part of 3. 0mm ABS filament with hot elements such as soldering iron at the end. You can clean the hinge hole with a 1/8 bit, which is a little bit larger than the 3 Th. 0mm. These are for 1/8. Thick organic sheets. There are two external hinge elements on the middle hinge of the door. Pair the bottom and middle elements to make them smooth (bottom)sides kiss. Your nerves will be smoother. The design of the surface joining plexi should suggest the area where the glue is applied. Gizmacci FiveThis \"disk\" contains a rotatable Direct and reinforcing rings for wiring/vents. All of these parts are designed for 1 inch holes. I got very good results at slow speed with a new 1 \"hole saw. An annoying feature of acrylic sheets is how edge defects resulting from cutting or drilling can produce the heart Fracture crack ( How do I know? I think it\'s cheap insurance to reinforce any holes through plexi. The Pass- By Will fit 1/4 or 1/8 (like I used) Use a ring as a gasket. The image should show the way the rotation passesthrough works. Be careful not to accidentally stick your spin ball to the ring It should move and relax freely. Since these two pieces are the same material, it\'s easy to glue, and it should work with your favorite ABS glue or plain acetone. This reduced head is taken from the \"clean skull\" by the ssd. I added some round eyeballs to the track. Zoinks! In addition, you need some ways to prevent the 3D printer from banging the wall of the box I would suggest fixing the countersunk heads to 6 wood screws by compressing the vertical plate anchors, they fit perfectly with the 6mm layers of my Printrbot. The holes for ventilation and wiring should be cut before you start installing the acrylic sheet together. I can say with authority that cutting the hole after assembling the box is a PITA. Use gentle pressure and slow speed. When the teeth are in contact with acrylic, make sure that the hole saw engages the plastic evenly around. Remember the extra list I suggested? Practice will pay dividends. Top: 2 inch holes in adjustable vent (Gizmacci three). I cut this hole in the center of the paper 16 inch from the front edge, but it can go anywhere. Left side: rotating Channel 1 inch hole- Through and power cable holes ( See Gizmacci V). Rotating channel- By positioning me 16 inch from the bottom and 16 inch from the front. In this position, the filament is gently curved from the wire shaft to the extruder, passing through- With the movement of the extruder, it is easy to adapt to slight changes in the direction. I also positioned the power cord hole 16 inch from the front and centered 3 inch above the bottom edge. Right: the data line on my laptop goes through a 16 inch hole, centered up 3 inch, like on the left. After cutting the sub-acrylic board into a suitable size, the basic box is quickly formed. Carefully determine which side will be inside; Remove protective film from these inner surfaces ( Haven\'t taken the movie off the door yet). Place the paper on top of the shell, up- On the floor, the unprotected side is facing up. The sides, back and goalkeeper are erected on the inverted top of the box, flush with the edge of the top. I fixed the sheets together with blue masking tape and used another piece of acrylic as a square to form a tight flush seam on the edge. Taking a moment at this stage will make you okay. Adjust the fit of the part. Check and double check Check the joints on the corners and edges. Once you are satisfied with the fit, fix everything tightly together with a lot of tape. You will notice in one of the photos that I shortened the back and front doors, assuming the top is just 18 inch wide (it was wider). I should subtract the width of the top by 1/4. If you cut the door at a height of less than 18 inch, as I suggest, for initial installation, minimize the binding of the top and bottom, flush the door with the top of the box. Braces are inside the door. Fix the bracket tape inside the door so that there is no tape at the end so that the bracket can stick to every corner. If the film is left on the door, if it should touch the door, it will prevent any glue from sticking to the door. At this point, the door just helps define the shape of the box. A few words about glue: glue ABS and acrylic need some special chemical reaction. Or not. This is the most frustrating aspect of the project. I only know what I have read, and I have read that there is glue specially made for this alliance. There is a lot of information about glue on the Internet, but the dozens of consumer goods displayed use vague labels and lack a determined product number to determine the correct formula. Glue with pipes, especially welding 1802, but I couldn\'t find it on all my trips to the hardware and plumbing supply sites. In addition, a variety of propylene salts or super glue is recommended. You might find something like that, but I finally found the epoxy Products based on Devcon household plastic welder. If you know the right product or try a different approach ( Simple acetone is recommended) Please leave a comment. There is also a word about glue: ventilation. You only have one brain, and in most \"plastic glue\", Methyl Ethyl Methane can make you particularly toxic. After your hole is cut, your box is installed together and is square, you have printed the izmacci to connect the acrylic sheet and you are ready to stick itDouble- Check whether the protective film is removed from the inner and inner surfaces of the bracket. Braces should be fixed to the front, back, top and bottom of the box inside the door. You can learn about the bracket positioning from the finished housing picture. Use sandpaper on a flat surface, ready to receive the gizmacci area of the glue Any irregular place should be polished with sand to make the surface rough. In many cases, the \"down\" side of the printed part is not the side that is being glued. Small batch work, mix a small amount of glue ( The working life of Devcon glue is only a few minutes). The larger the volume of the epoxy, the faster it will solidify. I found that when I applied butter and placed 4 printed gizmacci, the glue began to get too hard to apply evenly. Gizmacci one and two should provide enough brackets to connect your paper together. Careful planning and installation of the brackets will lead to cleaner work. First of all, you should be in 3- There is a pyramid on the side in the corner on the top, and the bottom corner has the \"foot\" of the hole \". Keep in mind that at this point in the inverted box assembly, the top corner is down and the bottom corner is up. At one end of the box, the stand is stuck at 2 inch- Wide braces located inside the door. Other brackets can be used to connect paper along the edge. I only used one extra bracket on each edge, but the two will hold the bracket firmly at each end. Your box should now be put together by some combination of Gizmacci one and two. A small poem: when made with 1/8 plexi, it is obviously bent. If you haven\'t already, use sandpaper on a flat surface to prepare the gizmacci area that accepts the glue Any irregular place should be polished with sand to make the surface rough. In many cases, the \"down\" side of the printed part is not the side that is being glued. Gizmacci three is an adjustable vent that can be installed in 2 inch of the holes at the top of the box. The center pin is a section of 3. 0mm thin silk with the end \"thinner\" of the hotimplement like a soldering iron. You can clean the center hole with a 1/8 bit, which is a little larger than the 3 Th. 0mm. Before you put the Gizmacci triple glue in place, turn the box over and make sure the protective film is pulled back from around the hole at the top of the shell. I think if you apply the glue to the perimeter of the hole and then position the vent, you will get better results. Gizmacci 4 will open the door depending on it. The pin suspended by the hinge is part of 3. 0mm ABS filament with hot elements such as soldering iron at the end. You can clean the hinge hole with a 1/8 bit, which is a little bit larger than the 3 Th. 0mm. These are for 1/8. Thick organic sheets. There are two external hinge elements on the middle hinge of the door. Pair the bottom and middle elements to make them smooth (bottom)sides kiss. Your nerves will be smoother. These instructions are assumed to be installed on the left side. The design of the surface joining plexi should suggest the area where the glue is applied. Vertical positioning of hinges is not important. Before gluing the hinge, remove all masking tape and protective film from around the hinge. For the best results, please pre-determine the order of the adhesive hinge assemblies and logically lay them out before you start. Starting with the bottom element, mix a small amount of glue, apply carefully on the surface that touches the side of the shell, and be careful to avoid applying glue on the door. Before gluing the intermediate elements of the hinge assembly to the door, both pieces are allowed to be set. Again, when gluing this part, be careful not to stick the glue on another piece of paper of acrylic and stick it to the bottom element, from plane to plane, for maximum hinge pleasure Let the middle part of the hinge also secure, and then glue the final top element as before. Gizmacci fiveconsistthrough and 5 -1 inch rings. An annoying feature of acrylic sheets is that edge defects resulting from cutting or drilling can create the heart -- Fracture crack ( How do I know? I think it\'s cheap insurance to reinforce any hole in the plexiglass. Stick the ring to each side of the wiring entrance hole and trim any excess glue from the inside of the hole. Range of passes- Before assembly, it should be smooth by sticking together. I glue these parts together with Duco Cement, but you may use acetone or other \"model glue \". After gluing the spherical hub, I trimmed the ridge from the joint and slightly polished the ball. The captive part is slightly smaller than the internal dimensions of the contour ring, and when bonded together, it should remain the same. The Pass- By Will fit 1/4 or 1/8 (like I used) Extra ring as a gasket. Images and photos should show how the rotation goes throughthrough works. Be careful not to accidentally stick the spinning ball to the contoured ring- It should move and relax freely. The skull knot door on the shell needs a knob, because the organic shape like the skull looks great when 3D printing, so I took a 3D model of the skull, chopped and crushed it and stuck it on the knob There is a screw hole at the bottom, but a small piece of the Devcon Home plastic welder is competent for the task of sticking it firmly to the front, so no drilling is required; There is no need for cracks. Finally, I used small pieces of plastic welder ( Its core is epoxy resin)to glue super- Several points on the face of the door have strong rare earth magnets. The good thing about this is that the magnet is its own. clamping. I put them in place, stuck to each other through two layers of plexiglass, attached to the inside, attached to the stand, and attached to the outside of the door. After applying some glue next to the magnet, I slide and rotate the magnet in place so that the glue is evenly applied to the inner surface of the magnet. Boom! Izmacci one designed four elements in the four bottom corners of the shell. There is a hole in the bottom surface of this thing, intending to hold the whole of her with a screw Tighten the surface of your work. I used 6 wood screws because I bought a box of wood screws, but the drywall screws would be nice. Once you screw it up, you\'ll be surprised by the stability of the whole building. If you\'re so inspired, some sort of quick In order to release and remove the pins and tailstock quickly, the release pins and tailstock will be great. After all the hassle of making the case for a 3D printer, keeping the printer in place should be a priority. I recommend vertical plate anchors as they are countersunk and can screw 6 wood screws, perfect for making 6mm layers of my Printrbot. I have nothing if you have another 3D printer; But find something. You will be happier. Wooo! Good Work! The 3D printer is securely packaged in an insulated and protected enclosure. You are directing, you are the master of the environment, you are the creator. Enjoy.


 towell@sztuowei.com