


 towell@sztuowei.com


Get in touch.
Dear,I will reply in 12 hours. All your message are protected!
Rapid Prototyping Services, Professional manufacturer of CNC Prototyping and 3D Prototyping in China.
You can use the technology outlined in this manual to make very large lenses, lenses that produce special effects, and sculpture lenses with free shapes.
You need to know how to use a CNC router or access a beautiful 3D printer.
With one of these two shots, you can start making the shot right away.
BackgroundI made my first shot while making a projector for robot sculpture.
I built the projector assembly of the sculpture myself and couldn't find the projection lens that met my requirements.
Each commercial lens is either too small or too expensive.
I decided to try to make my own shots (
Although I know almost nothing about optics).
I found a large piece of acrylic plastic and used 3-
Grind it into an axis CNC router in the shape of a lens.
The image taken by the lens is a bit blurry, but the effect is good!
I have been obsessed with perfecting this technology since then.
I developed best practices for cutting lenses on CNC routers, learned how to print optical elements on 3D printers, and created a polishing technique to improve optical clarity.
Recently, I made a series of face models using the facilities of the Autodesk Terminal 9 workshop
Distorted footage of the public festival.
I hope that by sharing what I have learned, I can inspire others to make their own optics.
Included: It's hard to design a good lens, but it's easy to design a fun lens!
Before getting your hands dirty with real objects, it helps to understand how the lens design is performing.
Fortunately, computers are good at simulating lenses.
Before making the lens, you can test the lens using any 3D modeling package with Ray-tracking mode.
There are a lot of software packages that do ray tracing, including some free ones.
I chose rhinos and neon lights.
It's spending money, but it's T-
The Splines plugin makes it very simple to design a smooth lens geometry. The 90-
For most projects, one-day trial is enough.
Any modeling software with Ray tracing is OK.
You can use Fusion 360, Blender, Maya, or whatever the kids are using these days.
Get a tutorial on setting up ray ad to set up light-
Track the glass material in your program.
Depending on the software you use, the steps may vary.
I found a rhino blog post and used it.
In addition to one thing: the refraction index, the setting of your lens will be the same as the glass.
It turns out that plastic bends light in a different way than glass, so you need to adjust this value.
You need to change the refraction index on the material from 1 to 1. 52 (glass)
More suitable for your lens.
Please use 1 if you follow my milling tutorial. 49 (acrylic).
If you use Vero Clear for 3D printing, use 1. 63.
Once set up, start applying the material to a different geometry and view the results.
Place an object as familiar as a face in the scene as a reference point.
Sometimes it helps to start with a simple shape and deform it using a engraving tool.
I pieced together a short tutorial on my process with T-
Rhino here.
If you're in math
You can try to apply different functions to deform the surface or read the mathematical knowledge of light.
If you don't, try carving a lens to achieve a goal, such as making one's eyes look close.
When you sculpt the deformation, the deformation will quickly become strange.
I suggest doing some minor deformation before going crazy.
Here is a video outlining the process.
You need a beautiful printer if you want to 3D print the lens.
Most resin and stereo printing
The resolution based on the printer is necessary.
If you want to try it (Makerbot style)
Printer, you have to cast transparent resin, which is completely feasible.
While there are many ways to make custom lenses, 3D printing is probably the coolest.
You can export the 3D model of the lens and watch it print without much planning or physical labor.
In addition, additional material manufacturing can provide more complex lens design, including bottom and doublesided geometry.
However, this flexibility comes at the expense of expensive materials and lower optical clarity.
My experience at the Autodesk Dock 9 seminar was that we were lucky enough to get the Objet connecx 500 3D printer.
I made many small and upside down lenses with this photosensitive resin printer and VeroClear transparent material.
Printing is simple.
I just pressed the print and let the footage accumulate overnight.
However, even on our exquisite printer, the lens ends up getting dim and comes with artifacts from layers --
Based on the printing process.
Polishing and polishing for 5 hours (
Step 4)
Lenses need to be transparent.
Even so, the printed lens does not match the optical clarity of the ground lens.
Others are also printing optical systems in 3D.
few months after I started printing shots on our Objet, the team at Formlabs made an excellent step-by-step guide for 3D printing monocle.
cool startup called Luxexcel uses specialized machines to print shots professionally.
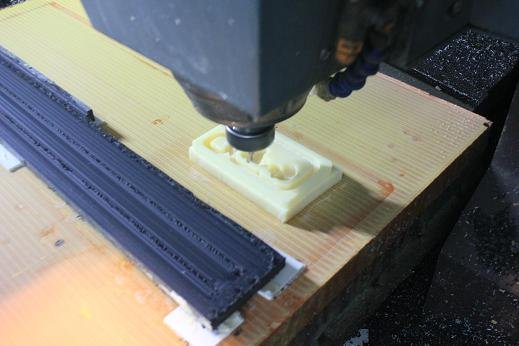
CNC machining is more complex.
Every tool path you program has hundreds of options and you never really know what's going on.
I grind 12 shots and get some good results. 3-
Shaft milling is done with balls
Vertical Grinding of thick acrylic sheet. (1/2' in image)
For your router, the bigger the better.
The larger the radius of the tip, the less serious your sector will be.
I usually use ball mills of 1/2. I set the step-over to 0.
02 'means 300 concentric channels are required for a 12' lens to be cut!
It may take a long time.
I'm not going to buy Super.
But I will make some details.
I learned about speed and feed from this document.
01 'at 12000 rpm/tooth.
I do CAM in Fusion 360 and this is the friendliest CAM software I have ever seen.
Parallel machining, deformed helices and helices are good tool strategies.
Here is a link to my latest Fusion file where a great toolpath is applied.
It's to make your eyes look like big eye shots with cartoon characters.
Printing or milling can fill the edges of the lens with flaws and make it cloudy.
You need to polish your lens Ridge until it gets smooth.
It's a hard and tedious job, but it's worth it.
Good finishing makes a difference between a clear shot and a cloudy one.
Every time you think you have finished the grinding steps, Polish some more.
It's not until the whole process is over and after a few hours you know if you 've done enough. :-
/Start with a rough sandpaper to remove the stripes and gradually get smaller to remove the details.
Wet all the sandpaper.
Follow these steps: Polish after polishing and polish with Novus 2 smooth plastic.
I use a rag or a clean polishing wheel on the drill press.
This has greatly accelerated the speed.
For more information on polished acrylic resin, please read this document.
Flame polishing is not recommended as it can distort your lens.
Some ideas on how to use your new lens
Production power: a solid understanding of refraction 101 is critical for optical design.
You can learn about it on Wikipedia or any physics textbook.
Salman Khan's video series on waves and optics is as exciting as ever.
I like his analogy between the wave and the car, embedded below: About the lens used in the camera, a lot of photos have been written.
The terminology used by the photographer is slightly different from physics, but the concept is the same.
Understanding how the camera lens works can make it easier for you to design your own lens. Plano-
Convex lens-
The convex lens is flat on one side, and the other side is bent outward.
They are easier to make because we can keep one side of the material flat, which makes it easier to Polish and Polish.
You can create such lenses using the thin lens equation parameters.
Fortunately, I 've done this and you can use my lens model on Thingiverse as a starting point. (
Need work, I would be happy to make any edits to the OpenSCAD program)
All shots at the top of the gallery appear in the form of IGES entities and STL grids.
STLs is a pain for CNC, but great for printing.
The great artists were inspired to some extent by the success of my colleagues at Residence borrowing McMater Carr parts and printing them, and I noticed that Edmund Optics had most of the lenses available for I.
So you don't have to do any math.
Optical mathematics is very difficult, and it is very difficult for optical mathematics in mathematics.
Max and I turned our footage into an engaging public art project trying to turn strangers into friends.
Our first installation site is the Prototype festival of Market Street.
We drilled a small hole in the lens and hung them on the rope.
We hang them on the tube and configure the strings so that the height of each lens can be adjusted.
During the three days of the festival, we put it on the Market Street in San Francisco and people had a good time.
The video above includes interviews and footage that communicate with each other through these strange shots.
© 2005-2025 Shenzhen Tuowei Model Technologies Co., Ltd. | All Rights Reserved 粤ICP备11096697号

